Do I need brake ducts on my track car?
11.23.2020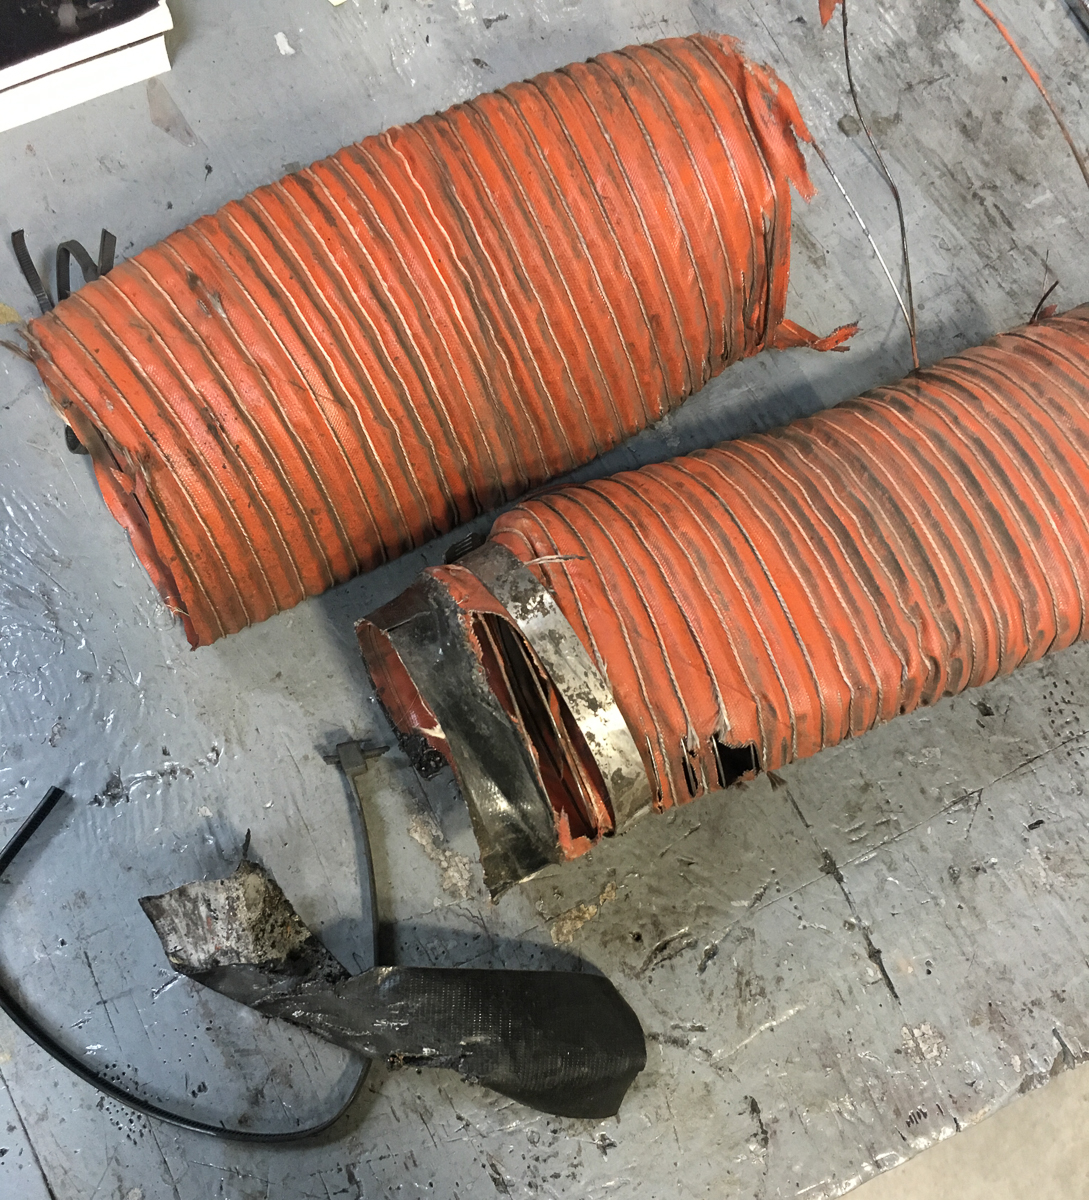
By Jeff Ritter and Mike O’Neil
You’ve decided that your brakes need more cooling air. Cooler is better, right? Before you grab some dryer hose, sheet metal, duct tape and start fabricating your technological marvel, please pause a moment to consider the information below. It could save you a significant amount of time, money, and headaches.
What makes iron brake discs crack?
Contrary to popular belief, high temperatures do not crack iron brake discs. Steep temperature gradients (uneven temperature distribution throughout the disc) destroy them, as the hotter areas of the disc try to expand more than the cooler areas, creating large internal mechanical stresses. If you slowly and evenly bring a properly designed iron racing disc to 1300°F, you can expect it to run all day at the track without much drama. Good ductile iron racing discs are extremely stable at that temperature and beyond.
Brakes convert energy into heat through friction. Rapid, high energy heating creates the largest temperature gradients and stress levels. These are brake events that start at very high speeds, have maximum deceleration rates, and have large drops in speed. In short, a huge amount of heat is pumped into the disc in a very short amount of time. The disc friction face may see a 600°F temperature rise in three seconds, while just a fraction of an inch away the internal vanes might only increase less than 100°F. It takes time for the heat to flow through the disc, hence, the steep temperature gradients and corresponding large internal stresses.
Tracks like Watkins Glen, VIR, and Sebring with long straights followed by intense brake zones are the most challenging to brake systems. Meanwhile, meandering tracks like Roebling Road and Big Willow are less taxing on the brake components.
When we cool the brakes, we want to cool them in the most even manner possible. Our primary goals of the brake cooling system are:
- Keep the disc, pad, caliper, and brake fluid in temperature ranges where they are all happy.
- Cool the system in a manner that keeps disc stress levels down.
We want to distribute the air over a large area, promoting smaller temperature gradients. If you think about what some cooling systems do, which is to blast isolated parts of the disc with cool air, you quickly realize they may be counterproductive.
Why do you think you need brake ducts?
What data do you have that suggests you need brake ducts? Our customers are typically stumped when we ask them this question, since the vast majority have not collected any data on their brake system! They have no idea what temperatures their discs, pads, or calipers are reaching while on track. They may also have not collected any data on how many track miles or sessions they’re getting out of their brake pads or discs. Their overarching belief that cooler brakes must be better brakes is many times their only motivation for installing ducts.
Before you even think about adding brake ducts to your track car, you should have a solid impetus for doing so. The list of brake problems below are all caused by discs that are running too hot. Experiencing any of these issues would suggest that your discs might benefit from lower operating temperatures:
- You are experiencing pad fade despite running high-quality racing pads. Pad fade is when your brake pedal remains firm, but you suddenly must push the brake pedal much harder to slow the car at the same rate.
- You’re using high-quality racing pads, but they are burning up at a rate that is financially unsustainable. We’ve seen people go through a complete set of pads in as little as two or three twenty-minute track sessions. Your annual track budget can evaporate in a hurry at that rate!
- Your discs wear our prematurely. At extreme temperatures, some pads become very aggressive on the disc friction face.
- You are running a top-tier brake fluid with a high dry boiling point, but it is boiling on track and causing a soft brake pedal.
- Your caliper piston seals are getting so hot that they are losing their elasticity, leaking, and require frequent replacement.
- Your suspension ball joints are wearing out due to radiated heat from your brakes.
- Anodized hats and calipers are discoloring, usually turning brown. Don’t confuse this with painted calipers discoloring, since paint cannot even handle normal track temperatures in many cases. Anodizing withstands heat much better.
If you have any or some of the above problems, that still doesn’t necessarily mean you should install brake ducts. Ducts are just one potential path towards lowering brake temperatures. The reality is that they are one of the most, if not the most, complicated solution. Anyone who has ever installed brake ducts on their track car will likely tell you that they can be a royal pain to install and maintain. It’s tough getting them to fit. Once you do, it’s hard keeping the pieces all connected. The wires poke through the hoses. You can’t turn your car to full lock without your front tires rubbing them. Carbon pieces are fragile and crack easily. And, routing everything can be a huge hassle. If you can avoid them and still solve your brake problems via an alternate route, we strongly suggest you do so!
Unless properly designed and installed, brake ducts can do more harm than good. An effective brake cooling system, when needed, increases the air flow to the brake components, keeps all brake components in their proper temperature ranges, and cools the discs evenly.
Some sportscars now come from the factory with quite a bit of airflow from the front bumper to the brake components, despite not having any hoses. The open area between the duct at the front of the wheel well back to the front suspension can flow a huge amount of air at speed. There may already be a well-thought-out air deflector or channel on the control arm forcing that air in the direction of the brake components. In these situations, you must ask yourself if what you plan to install will be more effective than what is already there. Improvement is easier when you have a tube-framed racecar with room for two 4” ducts. It is much more challenging when you have a production car with very little room for a hose, especially if you want to allow much steering angle.
Common Problems with Brake Ducts on Production Cars
Collecting and moving air from the nose of the car
Essex has seen an incredibly wide variety of customer brake duct implementations over the years, and based on what we’ve seen, most have likely created more problems than they’ve solved. One of the main reasons is that many production road cars are not explicitly designed with brake ducts in the nose or front splitter, and tight packaging makes it nearly impossible to pipe a substantial volume of cooling air from the front of the car back to the brakes. In our modern era of Computer Aided Design, under-hood components are nested together tightly, eliminating most voids in the engine bay and surrounding areas. Take a windshield washer fluid reservoir for example. Cars used to have a square or cylindrical reservoir sitting on top and to the side of the engine. Now we see intricately shaped reservoirs buried behind the front fender liners, many times surrounded by radiators, oil coolers, turbos, intercoolers, power steering coolers, air conditioning components, etc. Threading a sizable air pathway through those components can be a messy affair!
Modern aerodynamic design also makes it tricky to integrate brake ducts. Front ends designed in a wind tunnel now carefully dictate airflow across, over, around, and through the car. If the car wasn’t designed with dedicated brake cooling ducts, how do you know if you’re pulling air from a usable location? Blindly installing NACA Ducts without any knowledge of where to place them or how to precisely shape them may not provide as much airflow as one would like or expect.
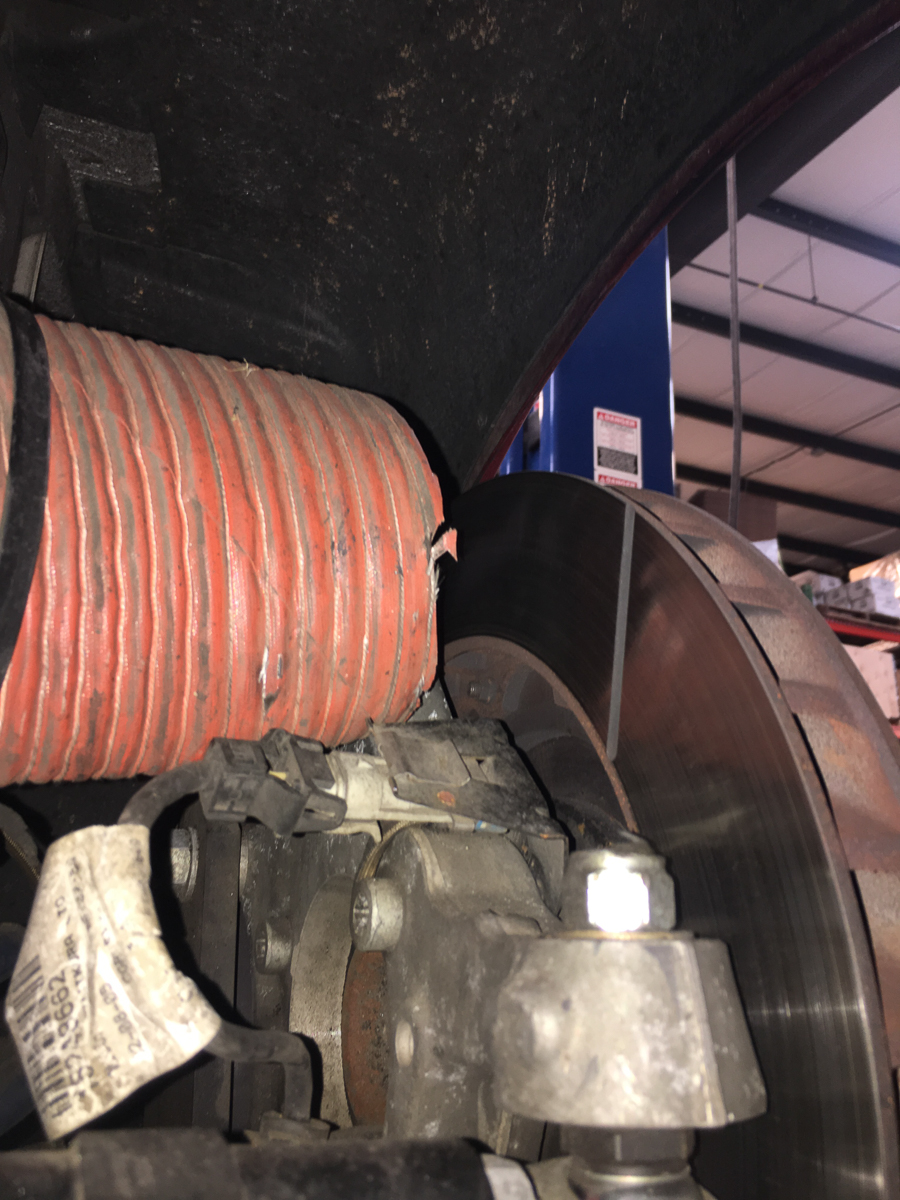
Assuming one can collect a sizeable amount of cooling air from the nose or under-tray of the vehicle, that air must then be carried all the way back to the brakes while losing as little air volume as possible. A major pinch point occurs at the inner fender liner. The width of the ducting is typically reduced dramatically to squeeze past the wheel and tire to allow for anything close to steering lock. The problem becomes particularly pronounced with wide wheels wrapped in race rubber. In these situations, the air is moving along a convoluted path from a 4” tube at the front of a car to a 1” wide rectangle, then back to a 3” cylinder. What do you think happens to the volume of air along that circuitous path? Below is a common brake duct solution used on C5 Corvettes. To squeeze past the front wheel and tire, the black plastic piece at the inner fender liner has a significantly reduced cross-section. Keep in mind that airflow is limited by the most restrictive point, regardless of the duct size elsewhere.
The three forms of cooling at work
Thermal energy flows through and from a brake disc via three mechanisms: Radiation, convection, and conduction.
Radiation has little effect at low temperatures but becomes a significant factor at track temperatures. This one is relatively easy to address. Just make sure that the disc friction surfaces are exposed. If your car has bolt-on splash shields, remove them. You might want to leave small remnants of the shield covering ball joints for their heat protection. If the splash guard sandwiches between the hub bearing assembly and the suspension upright, removing the splash guard completely will shift the hub assembly and disc inboard, and may move the disc off center relative to the caliper. To prevent altering the disc location, trim the splash guard back rather than completely removing it. In general, the more that the disc is shrouded, the hotter it will run.
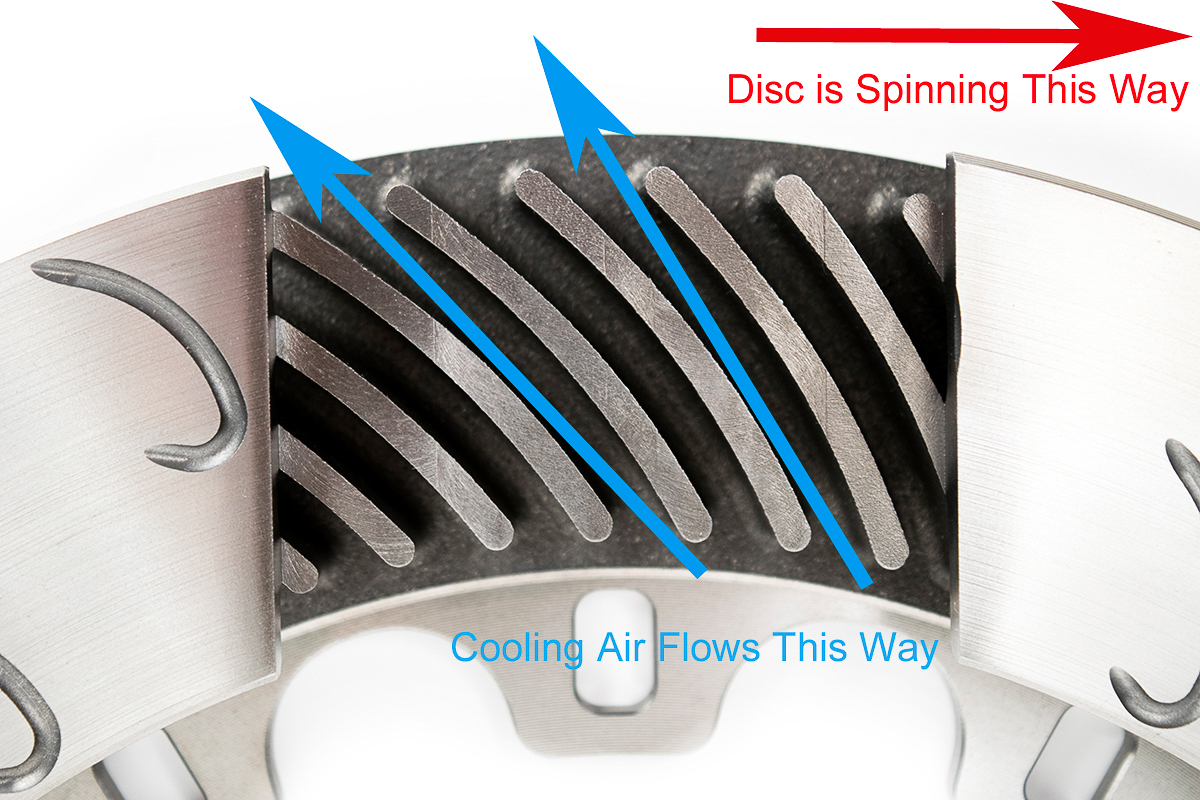
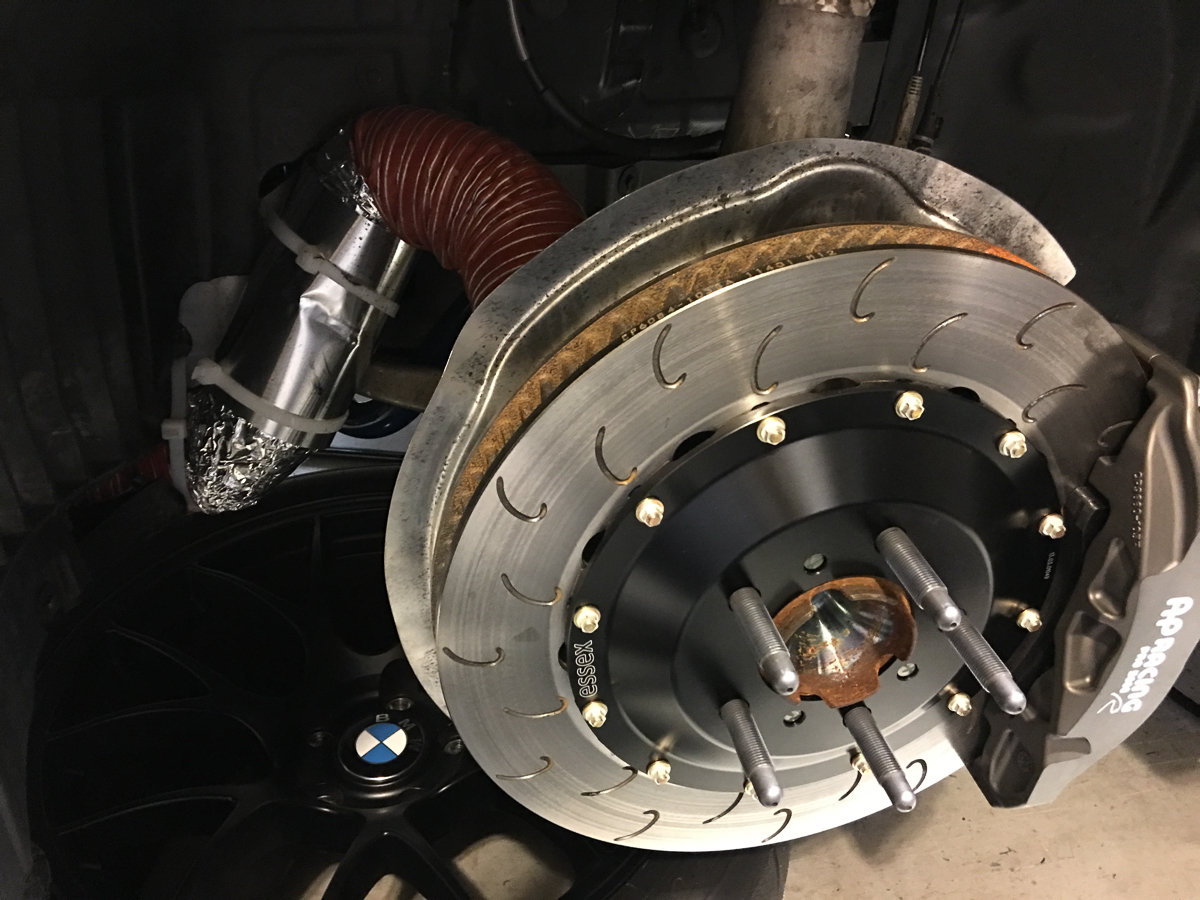
Convection refers to the transfer of heat as fluid (air in this case), as it flows over and through the disc. Some convection takes place as air flows over the friction faces. On an optimized ventilated disc design, even more convection cooling occurs as the air flows through the internal passages. The vanes suck the heat out of the back side of the friction faces, have a very large surface area in contact with the air, and act as a fan pumping air across those surfaces. As air passes across the vanes, it absorbs heat and evacuates it towards the outer edge of the disc. Brake ducts lower disc temperatures by forcing more air through the internal disc vanes. That forced air is coupled with the centrifugal force generated by the spinning directional cooling vanes, drawing additional heat from the disc. The picture below shows an AP Racing J Hook Competition Disc with a high number of directional internal vanes. As a disc spins, those vanes act like a pump or fan, pushing hot air out and drawing cool air in. This is one of the primary reasons why a proper directional racing disc is far more effective and efficient than an OEM-style disc, which in many cases does not even have directional vanes.
The final way heat escapes a brake disc is via conduction as it travels through the connected metal components of the disc hat, hubs, studs, brake pads, and bearings. On a good 2-piece floating disc, conduction has a much smaller impact on disc cooling, and there isn’t really much we can do to change the amount of conduction cooling.
Back to the ducts!
Convection is the area where we have the most control over disc cooling. That is why we duct air. However, we must make sure that we’re doing it in a manner that helps more than hinders the situation. Rather than dumping a large amount of cool air in one location, we need to distribute that air over as much surface area as possible. This spreads the cooling effect evenly throughout the disc, minimizing thermally induced stresses (cracks).
Many of the customer duct setups we’ve seen deposit air in the worst possible location: directly onto the inner disc face, rather than into the internal disc vanes. When you dump a substantial amount of cooling air directly onto the inner disc face, you are promoting disc cracking. The outer disc face continues to run hot, while the inner disc face is blasted with cooling air, which creates an enormous amount of stress between the two halves of the disc. Below is a photo of the terrible duct setup that was installed on the author’s C6 Corvette when he purchased it. Any cool air making it to the disc is dumped directly onto the inner disc face, and virtually none of that air would make it into the internal vanes and the outer disc half. That is a recipe for rapid crack propagation!
To prevent cracks, we want to keep the temperature across the entire disc as even as possible. If it is perfectly even, all areas expand the same amount and there are no thermally induced stresses no matter what the temperature may be. When we have hotter and colder areas, the hotter areas try to expand more, while the colder areas try to hold them back, creating stress. The larger the temperature variation, the larger the internal stresses, and the higher the propensity for cracks.
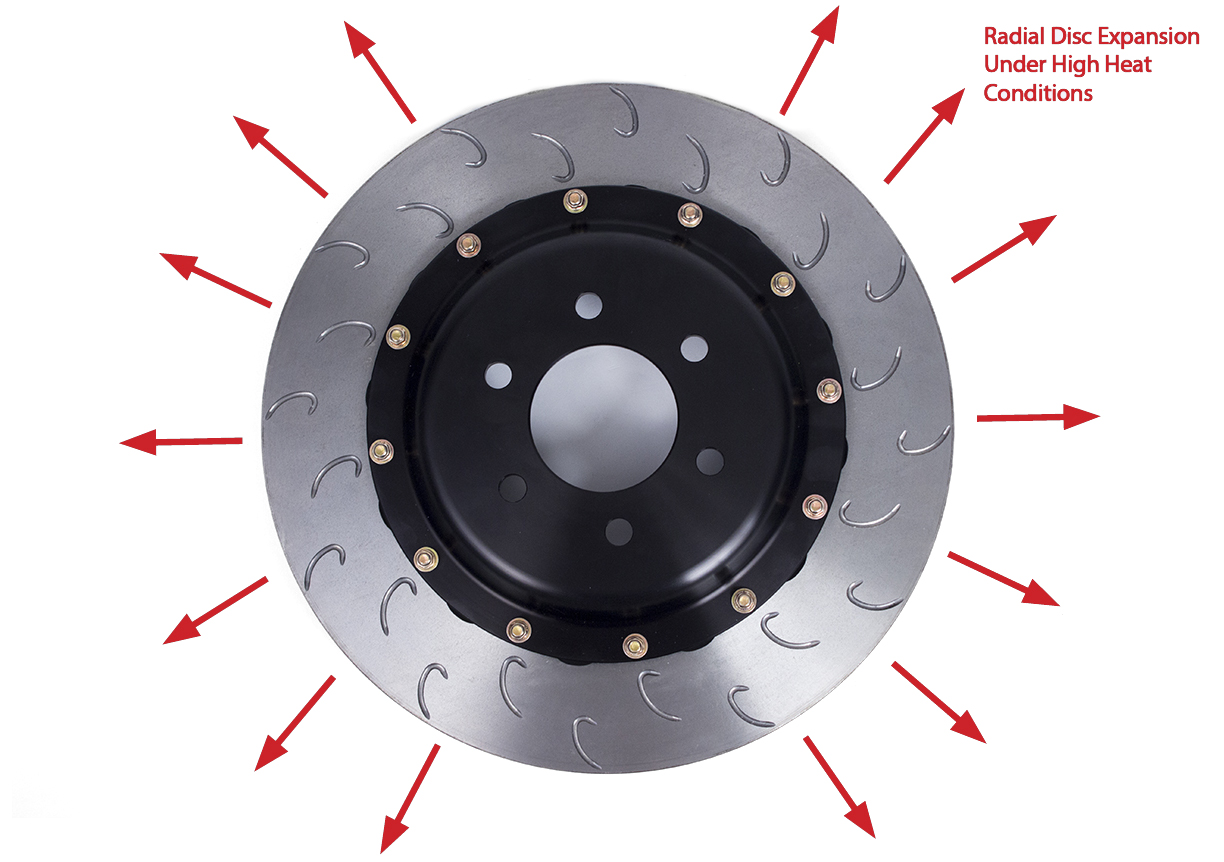
In a properly cooled brake system, both halves of a brake disc operate at approximately the same temperature. If one half of a brake disc is run at a substantially higher temperature, several problems can occur. One of the biggest is distortion and coning of the disc. Iron brake discs grow when heated. At track temperatures, a disc expands radially, increasing in diameter and circumference. It expands in thickness as well, but the amount is much smaller.
If the inner disc face is doused with cooling air while the outer is not, the two disc halves will expand different amounts, creating distortion and coning, in addition to the crack-inducing stress mentioned above. Coning directly impacts the brake pads’ contact with the disc, leading to uneven pad wear and tapering, and even a long brake pedal. Below is an illustration of radial disc growth.
A two-piece floating disc mitigates coning to a large extent by allowing the disc to grow more freely.However, it can still “cone” if the temperatures of the two faces vary greatly.
Running the inner disc face too hot
In addition to conduction and convection, a disc sheds heat via radiation into the surrounding air. For many of the home-brew duct setups we see, radiation is either ignored and/or severely hampered. Yet, at high track temperatures, radiation is a crucial part of the brake cooling process.
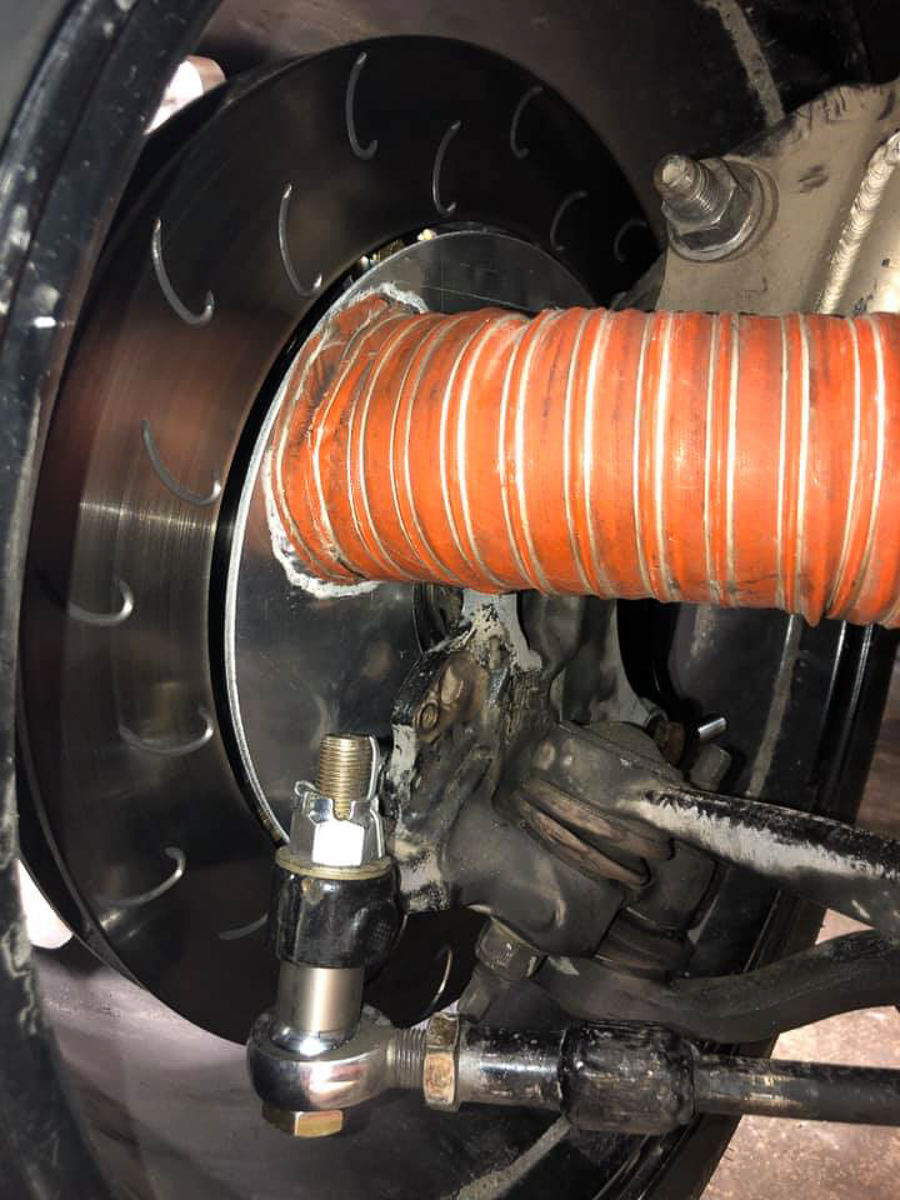
A common approach for directing airflow is to mount a sheet metal or carbon fiber plate on the spindle which points a 3-4” hose at the disc. Others leave the OEM disc splash shield in place, and simply cut a hole in it. In many cases that plate covers some portion, if not all, of the inner brake disc face, turning that plate into a heat barrier and reflector. Rather than allowing heat to escape into the wheel well, the duct mounting plate traps and reflects the huge amount of heat radiating from the inner disc face back into the disc causing the inner disc half to run significantly hotter than the outer half. Just as you don’t want to run an inner disc face cooler than the outer face by dumping air on it, it’s equally undesirable to run the inner disc face hotter by limiting its ability to radiate heat. Doing so will lead to the disc distortion and coning problems described above.
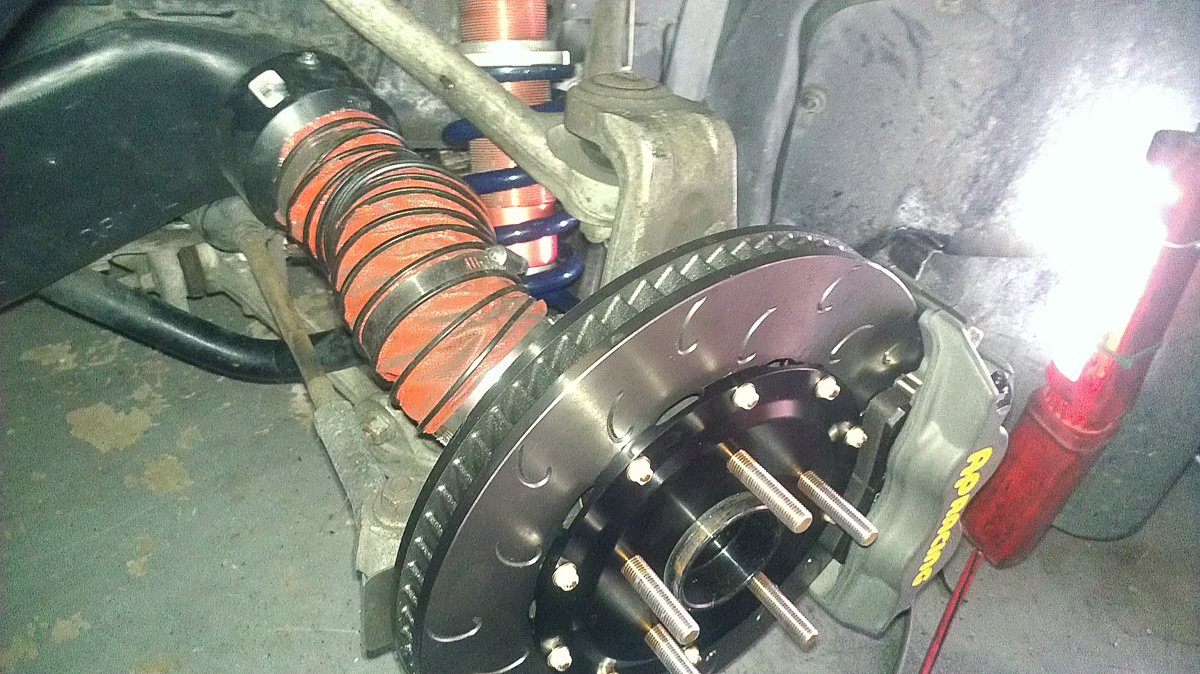
Below is an example of a duct setups that prevents heat radiation from the inner disc face. As heat radiates out of the side of the inner disc face, it is forced directly back into the disc, pad, and caliper. This is why one of the first steps in our brake kit install manuals is always to remove the OEM disc dust shield…we have our reasons!
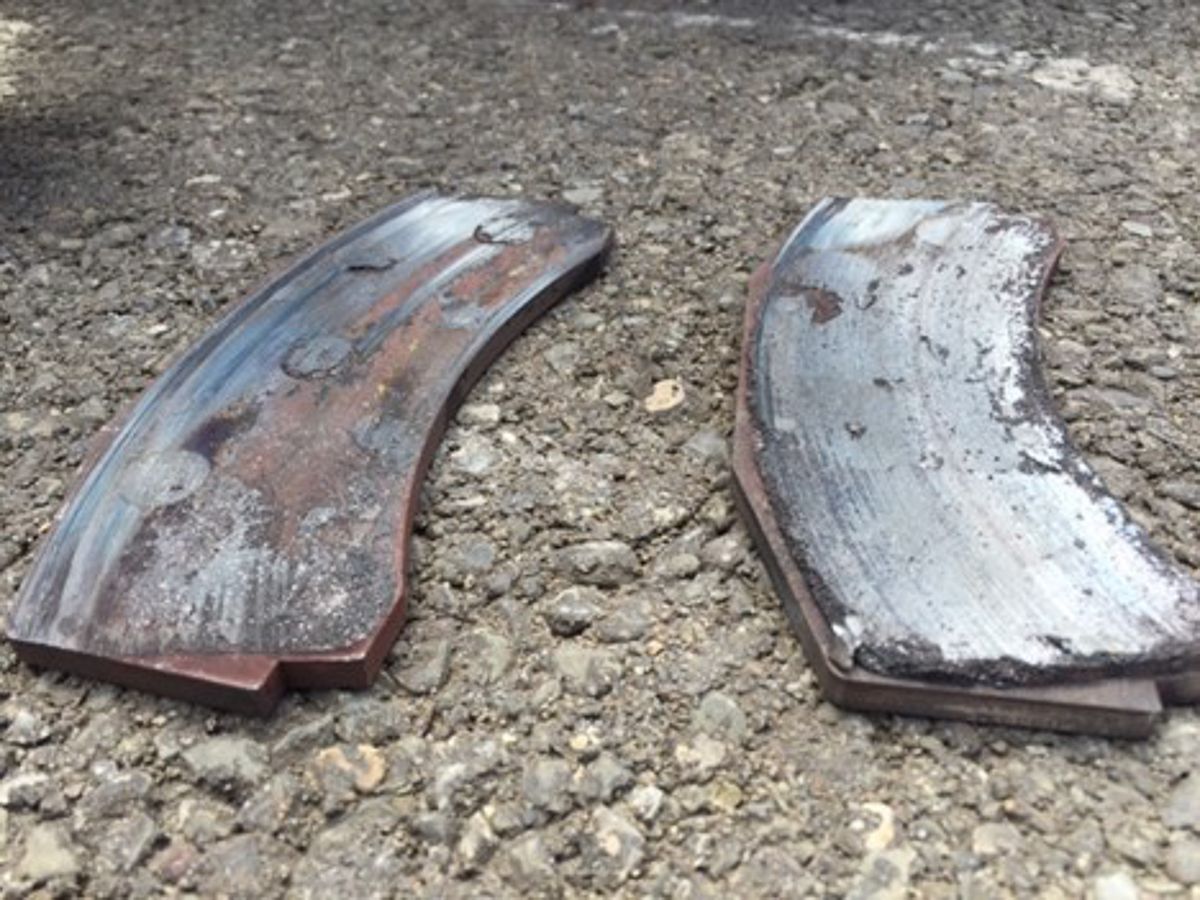
One of the other big problems we see when heat is trapped on the inner disc face is that the inner pads burn far faster than the outer pads. Not only does this negatively impact the overall service life of your pad set, it increases the odds of running your inner pads down to the backing plate and potentially damaging your discs. We have lots of pad examples like the one below, in which one pad was worn down faster and further than the other without the driver realizing it. When people check their pad wear, they commonly check only the outer pad thickness by glancing through the wheel spokes. While at the track you really need to look at the inner pads as well, as wear rates on the inner and outer caliper halves can be quite different, particularly if a cooling problem as described above exists.
Sandwiching ducts in the hub
Another issue we’ve seen is when duct plates are attached to the car by sandwiching them between the hub bearing assembly and the suspension upright/knuckle. Even though that sheet metal plate is thin, it is moving the brake disc outboard by an amount that often causes caliper clearance problems. When the owner attempts to install the new brake kit, he or she may find that the disc rubs the caliper, or that the outboard pad cannot be installed because the disc is not centered in the caliper. If you want your new brake kit to fit, don’t ever sandwich anything between the hub bearing assembly and upright!
A note on ducts with carbon ceramic matrix discs (CCM, PCCB, etc.)
Carbon-ceramic discs usually have a huge amount of friction area because they are trying to spread the heat over as large of an area as possible. The challenge is the “ceramic” in “carbon-ceramic”. Ceramic materials by nature are terrible heat conductors. Internal vanes are not very effective at cooling the disc because the heat is extremely slow at working its way from the friction faces to the air passages. Iron and carbon-carbon discs (the material used in F1, Indycar, and IMSA) are much better heat conductors, making the vanes much more effective. Carbon-ceramic discs rely on the larger surface area in contact with the air (convection, at low and high temperatures) and for radiation (at high temperatures) for cooling. Yet, they still generally see a higher temperature rise during a brake event than properly sized iron discs.
How do the pros do it?
In pro racing, things are decidedly different. Racecars built from scratch are designed to accommodate a proper duct setup. Also, production-based, purpose-built racecars don’t have nearly as much road-related junk cluttering the nose as a road car does. In some race series such as NASCAR Cup, there can be as many as three four-inch hoses attached to the calipers and discs. Those ducts are also connected to high-capacity fans forcing air to the desired locations. In Formula 1, brake ducts are intricate carbon fiber pieces designed to complement the other wind-tunnel tested aerodynamic components of the car such as the front wing. They gather air from appropriate pressure zones and move that air a very short distance in adequate volume. They don’t follow a lengthy, tortuously restrictive pathway!
Finally, pro teams have tight control over their duct setup. They're constantly gathering temperature data and know how much and when to let the system have more air. On some tracks that might mean taping the ducts off completely at the front of the car, while on others they are partially open. The common enthusiast at a club race or HPDE has neither the tools or means to collect and manage the required data to effectively integrate brake ducts. Properly managing ducts is just as important as installing them correctly, and doing so is not a trivial undertaking.
What should I do on my car?
Avoid thermal shock with a gradual warm-up and cool-down
If you are quickly and frequently cracking your brake discs on the track, there may not be a problem with your discs. It could be your driving! At any given HPDE we see drivers at full tilt before they reach the end of the blend line on their out-lap, then standing on their brakes into Turn 1. When they do so, they’re introducing a huge amount of thermal shock to their discs. The discs go from ambient temperature to many hundred degrees in the blink of an eye. That rapid temperature spike places incredible stress on the disc, or what we call thermal shock, and it can crack even the toughest iron disc. Unless you’re trying to win a race, you should treat your brakes like you do your tires on the initial laps of any track session. You should gradually bring your brakes up to temperature over the course of the first lap or two, progressively increasing your aggressiveness on your brakes. We can’t stress enough how important this is! Treating them in this manner can dramatically increase disc longevity. At the end of all sessions before pulling into the pits, make sure you complete your last lap off the brakes as much as possible. That will allow for a gradual cooling of your discs, which will lead to a substantial reduction in overall brake temperatures. If you exit the track and park in the middle of a hot lap, your discs will be searing hot. While those discs sit in stagnant air, their heat will transmit into your pads, calipers, and fluid, and the odds of boiling your fluid becomes markedly higher. Discs cool in an even (low stress) manner when rotating. They cool unevenly when parked with the section under the caliper remaining hot. Often cracks are created or extended when the car is parked with hot brakes.
Try more efficient discs with greater thermal mass
If you’re not bombing on your brakes out of the gates and you’re still having the heat-related problems described early in this article, your next step should be to switch to a disc with greater thermal mass and/or efficiency. Thermal mass can be gained by installing a disc that is thicker overall, has thicker walls, or is larger in diameter. Efficiency can be gained by installing a disc with correctly shaped directional vanes, and/or has a higher internal vane count to better leverage the cooling air that the discs are already receiving and moving. The discs in our AP Racing by Essex Competition Brake Kits are so efficient, that nearly all our customers find they no longer need any type of brake duct. In addition to greater efficiency and disc thermal mass, a properly designed competition brake kit will also raise the temperature threshold of your other brake components. Features such as ventilated stainless steel pistons, high-temperature piston seals, and calipers that flow more air and accept thicker pads will all increase the heat capacity of your brake system.
If you’ve already moved to a 2-piece disc kit or complete big brake kit with more thermal mass and efficiency in the discs, you should try running that system first without any brake ducts. If you have ducts on your car now, take them off while you are installing the BBK. Even if you have data showing that your brake ducts benefited your previous brake system, that doesn’t mean they will have a positive impact on your new one. Our experience tells us that they are more likely to cause problems and complications. If you find that you don’t need hoses that tear, wires hanging out, constant taping, rubbing on full lock in the pits, etc., it will be a big win! However, if you find that you're still burning through pads and discs at a fast rate after you’ve installed your new components, only then should you collect data and consider ducts.
Remove your OEM disc splash shields
The disc splash shields offer zero benefit to iron discs when run on the track. Get rid of them!
Leave OEM spindle deflectors and ducts at the fender liner in place
Many of today’s sportscars have plastic channels or deflectors bolted to the spindle that direct air towards the brakes. While they aren’t as effective as a professionally designed brake duct bringing air to the center of a disc on a racecar, they can still bring a solid amount of cooler air into the region of the brakes without dumping that air directly onto the inner disc face and causing problems. If these deflectors are on your car leave them in place.
If you have an aftermarket duct that terminates at the inner fender liner and dumps air into the wheel (like the black plastic piece in the Corvette example above), that can be beneficial. You will still be bringing some cooler air into the vicinity of the brakes. Trying to apply that air directly to the disc is where you’ll shoot yourself in the foot and create problems.
Always bed-in your new discs
You should always prepare you discs and pads for heavy use on the track. Running the discs through the initial heat cycles in a controlled manner will not only put pad material on the disc face where you need it, it will increase their longevity. Please be sure to watch our video in the Essex Learning Center titled “How to bed-in/burnish brake pads and discs”.
Aim your brake ducts properly
If all other solutions fail and your collected data tells you that you truly do need brake ducts, your primary objective should be to direct them towards the proper location. If you can somehow carry an adequate volume of air from the front of the car to the disc itself, it should ONLY be emptied into the center of the disc. Doing so will allow the internal vanes to distribute the cooling air evenly throughout the disc. No air should be blown on the inner disc face and having as little gap as possible between the duct plate and the disc ID will prevent air leakage. The locating plate on the duct below is one of the better aftermarket implementations we have seen. The plate seals the ID of the disc as much as possible, forcing air into the disc’s internal vane structure, and not allowing it to blow directly on the inner disc face.
A critical point still remains with this type of setup, however: It will only lower the brake temperature if the duct allows more airflow through the disc vanes vs. the center of the disc being open without a plate and duct. A proper racing disc with a high vane count makes a fairly good air pump on its own and will move a substantial amount of air unassisted. If the duct has a good high-pressure entrance at the front of the car, the track speeds are high, and the duct is not flattened to half of its normal cross-section where it clears the tire, then it can be effective at increasing the airflow through the disc. Otherwise, the disc/plate assembly could be restrictive, reducing airflow through the vanes and raising the disc temperature.


Customer Comments:
No comments posted yet
You must be logged in to leave a Comment